How to Fix Wi-Fi Networks Not Showing Up on Windows 11
Are you experiencing internet connectivity issues on your Windows computer? If so, you may find that Wi-Fi networks are not showing up on your available connections list. Don’t worry! It is a common issue and there are multiple ways to fix it. In this article, we’ll discuss the most effective solutions for getting those hidden Wi-Fi networks back on your Windows 11 computer.
Why Are My Wi-Fi Networks Not Showing Up?
Before you begin troubleshooting, it’s important to know why your Wi-Fi isn’t working. Here are some of the most common causes:
- The Wi-Fi adapter is disabled or not working.
- The wireless router isn’t broadcasting a signal.
- There are too many devices competing for the same connection.
- The Wi-Fi password is incorrect.
- The wireless settings are not configured correctly.
How to Fix a Wi-Fi Network Not Showing Up in Windows 11
To fix this issue, use the below steps:
1. Enable the Wi-Fi Adapter
Make sure your Wi-Fi adapter is enabled and working properly. To do this, do the following:
- Open the Control Panel and select Network and Internet.
- Then, click on Network and Sharing Center > Change Adapter Settings.
- Now right-click on the Wi-Fi adapter and select Enable.
If your Wi-Fi adapter is enabled, try running a network diagnostic to identify and repair the faulty driver. To do this, right-click on the Wi-Fi adapter icon and select Diagnose.
Windows will then scan for any issues that may be affecting it and provide you with an appropriate solution – just click Apply this fix if one is available.
2. Check Your Wi-Fi Router
If your device is enabled, then you should check your Wi-Fi router to make sure it’s broadcasting a signal. Try resetting the router and see if that helps. You can also check if other devices are able to connect to the network.
3. Run the Internet Connection Troubleshooter
Windows has a built-in troubleshooter tool to help diagnose and fix networking problems. To access the Internet Connections troubleshooter, follow these steps:
- Press Win + I to open Settings.
- Then navigate to System > Troubleshoot on the right side.
- Under Options is a button labeled Other troubleshooters – click it.
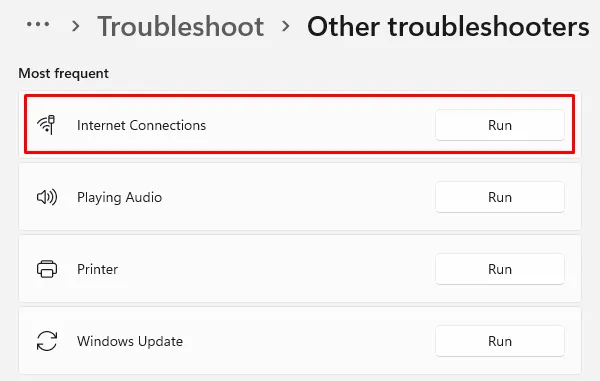
- Then select Run for Internet Connections.
Windows will initiate its scan of any potential issues that might be present and provide recommendations for fixing them; simply apply those guidelines as instructed by Windows, re-test your connection, and see if there are improvements!
4. Update the Network Adapter Drivers
Please enable JavaScript
After a recent upgrade, it is possible for Windows not to have the most current network drivers installed. Malfunctioning or incorrectly configured adapter drivers are also known to cause Wi-Fi connection issues. The best way forward would be to update the driver of your network adapter with its latest version. Here’s how to do it:
- Right-click on Start and select Device Manager.
- Once you open Device Manager, expand the Network Adapters section.
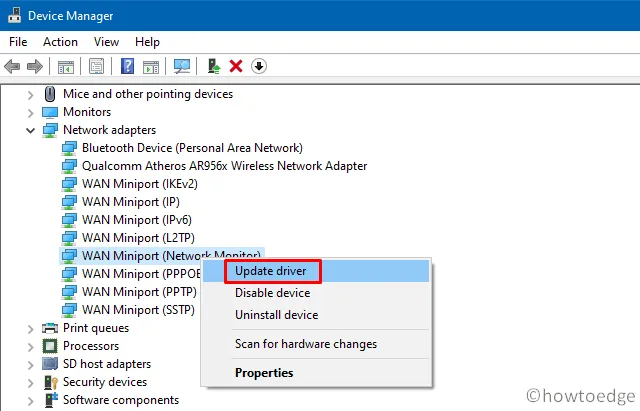
- Then right-click on your Wi-Fi device and select Update driver.
- After that click Search automatically for drivers, so that Windows will scan new drivers available and install them accordingly.
Once you complete the above steps, close the Device Manager window and check if the Wi-Fi option is restored.
5. Reinstall the Network Adapter Device
If you’re still missing the Wi-Fi network on Windows 11, you can try reinstalling your network adapter device. Here’s how to do it:
- To begin, open Device Manager.
- In the Device Manage window, expand the Network adapters option.
- Then, right-click on your Wi-Fi device and select Uninstall device.
- If prompted, click Uninstall to confirm the action.
After uninstalling the device, go to Action in your toolbar and then choose Scan for hardware changes so that Windows can discover any lost connected devices while reinstalling its vital drivers at once.
6. Perform a Network Reset
- To reset your network, go to Settings.
- On the left side, click on the Network & internet tab.
- Then scroll down and select Advanced network settings; here you’ll find all of your devices listed as well as an option for a full Network reset.
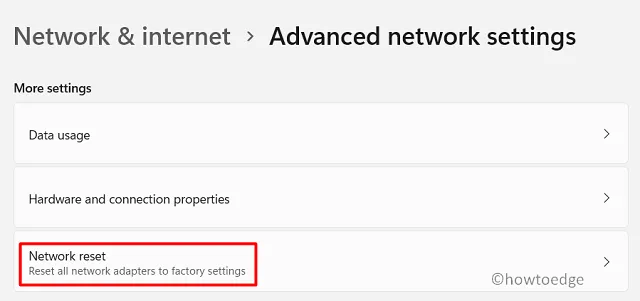
- Under the More settings section, click the Network reset option.
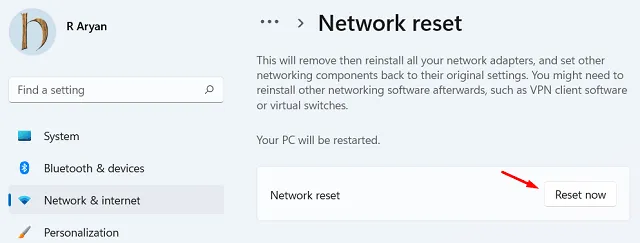
- Next, click Reset now and then hit Yes to confirm the action.
Once you reset it, you will find your Wi-Fi connection has been restored. It’s possible that other networking devices and software may need to be reinstalled and reconfigured afterward though.
7. Check For Windows Updates
The last resort for restoring your Wi-Fi connection is to check for Windows updates. Microsoft regularly releases patches and updates for the operating system with fixes for various issues, so it’s always a good idea to make sure you’re running the latest version of Windows.
To check if any updates are available, go to Settings and click on the Windows Update option.
If there are any pending updates, they will be listed here; just download and install all the available updates, restart your computer, and see if that solves the problem.
If none of these solutions have worked for you, it’s best to contact the manufacturer of your device or a local IT expert for help. They will be able to diagnose the issue and provide you with the best solution for fixing it.
Frequently Asked Questions
1. How do I fix my Wi-Fi connection on Windows 11?
First, make sure your router is properly connected and powered on. Then open the Network Settings menu in Windows 11 and select “Network Adapter”. Select the “Change Adapter Settings” option and choose your Wi-Fi connection. If there are any errors, click “Diagnose” and follow the instructions provided. If the issue persists, contact your internet service provider for support.
2. Can Wi-Fi work without the internet?
No, Wi-Fi requires an internet connection to function. It is a wirelessly connected network that transmits data between devices and the internet. Without the internet, Wi-Fi is unable to function.
3. Can I use my WiFi without a router?
No, you will need a router in order to access Wi-Fi. The router is the device that connects your internet service provider’s network to your home network. Your router will also allow you to access the internet and create a local area network with other devices in your home.
However, you do not need to buy an additional router if you already have a modem. Most modems will also function as a router.
4. What is the difference between a modem and a router?
A modem is a device that connects you directly to your internet service provider’s network. A router is a device that connects your modem to your home network, allowing you to access the internet from other devices in your home. The router also creates your local area network, allowing you to share files and devices with other computers in your home.


Leave a Reply