How to Set Windows 10 Theme without Activation

Users may usually change or set a default theme on their Windows 10 PCs by navigating to Settings > Personalization > Themes. Several users complain of this option being grayed out. Well, this happens only when you haven’t activated your Windows 10 copy. Worry not, as you can always modify the required setting and thus set Windows 10 theme even without activation.
All you require is to make a few changes in the Local Group Policy Editor or inside the Registry Editor. Go for the registry method if you are on Windows 10 Home Edition, else go with the policy method. Let’s learn both these methods in detail.
Please enable JavaScript
Setting Windows 10 Theme without Activating Windows
Now that you have downloaded a theme, you must deactivate the “Prevent Changing Themes” setting using Group Policy or through the Registry. The correct procedure is provided below –
1] Use Group Policy to disable “Prevent Changing Themes”
To disable the “Prevent changing theme” using Group Policy, use the following steps –
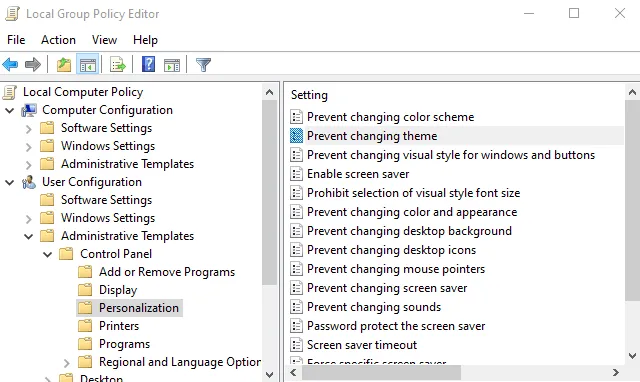
- First of all, open the Run prompt using the Windows + R keys.
- Type “
gpedit.msc” and press Enter to open the Local Group Policy Editor window. - Inside the Group Policy page, go to the following path location:
User Configuration > Administrative Templates > Control Panel > Personalization
- After you reach out to the above path, locate and double-click on the Prevent changing theme policy.
- Check the Disabled checkbox and then click on the OK button to apply the recent changes.
2] Make changes to the registry
If you have Windows 10 Home Edition on your PC, you can still disable the “prevent changing theme” entry using the Registry Editor. The correct procedure is provided below –
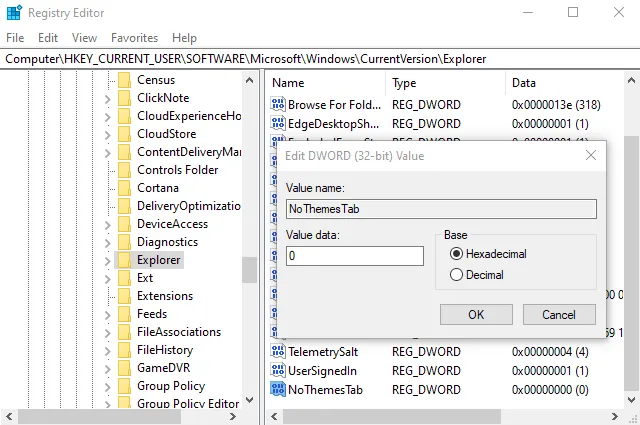
- Press Windows + S to launch Windows Search and type “Regedit” in the text field.
- Click the top result i.e. Registry Editor and hit Yes when the UAC window prompts.
- When the registry opens up, navigate to the below path on it –
HKEY_CURRENT_USER\SOFTWARE\Microsoft\Windows\CurrentVersion\Policies\Explorer
- Select Explorer from the left navigation, right-click on it, and select New > DWORD (32-bit) Value.
- Right-click again on the newly created key, select Rename, and then name it as NoThemesTab.
- Double-click on NoThemesTab, and set the Value data as 0.
- Click the OK button to apply the recent changes.
Restart your PC and you will be able to use Windows themes even on non-activated Windows.
How to Set Windows 10 Theme without Activation
If you have disabled the “Prevent Changing theme policy using the Group Policy or the Registry Editor, you may set a Windows theme even without activating your Windows. Follow the below instructions on how to proceed ahead with this task –
- Right-click on Start and select Settings.
- Go to Personalization and select Themes from the right pane.
- Select Get more themes in the Microsoft Store link right under the Change theme section.
- In the Store apps, search for a theme you want to get and then download it.
- After downloading, double-click on the. themepack file to apply the theme on your PC.
I hope you are now able to use any Store theme even on a non-activated Windows 10 PC.




Leave a Reply