6 Methods for Changing the Administrator in Windows
While Windows normally makes the first user on a computer the administrator, there are several reasons and methods for changing the administrator in Windows. This post gives six ways to change the administrator in Windows, whether you’re adding new administrator-level users, promoting a Standard user, or switching to a different administrator entirely. Simply choose your preferred technique and get started.
1. Using the Settings in Windows
The most basic approach to learn how to change the administrator in Windows is through Windows Settings.
- Open “Settings.”
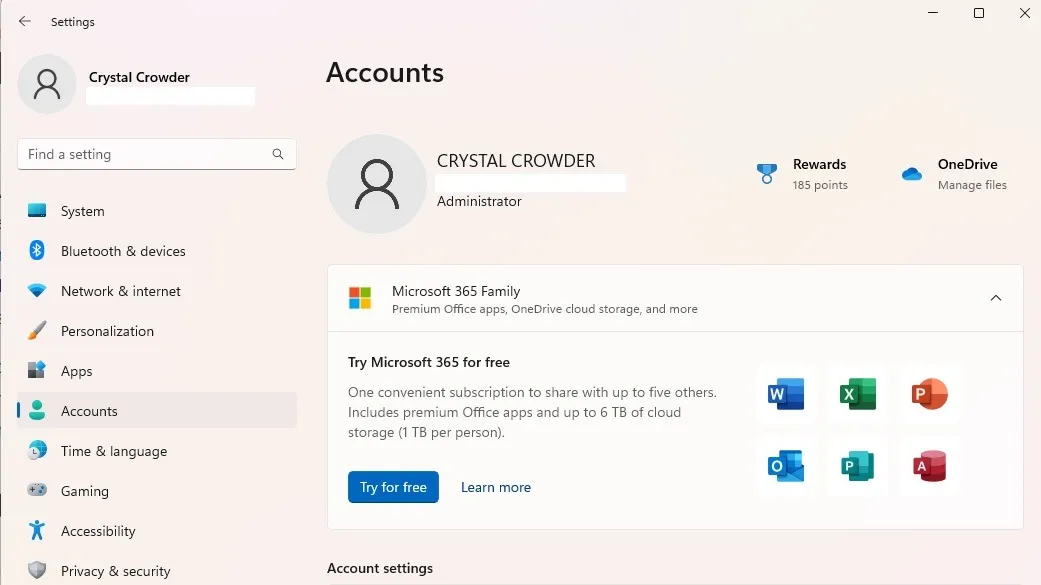
- Select “Accounts” in the left pane.
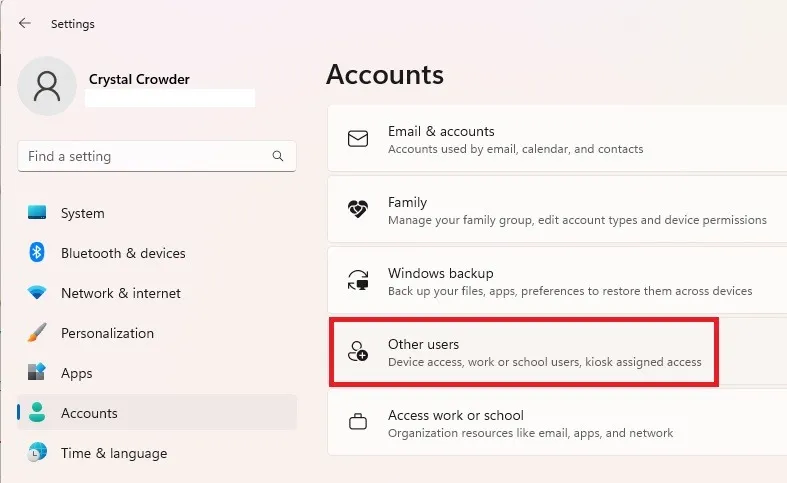
- Select “Other users” in the right pane. This is called “Family & other users” in Windows 10.
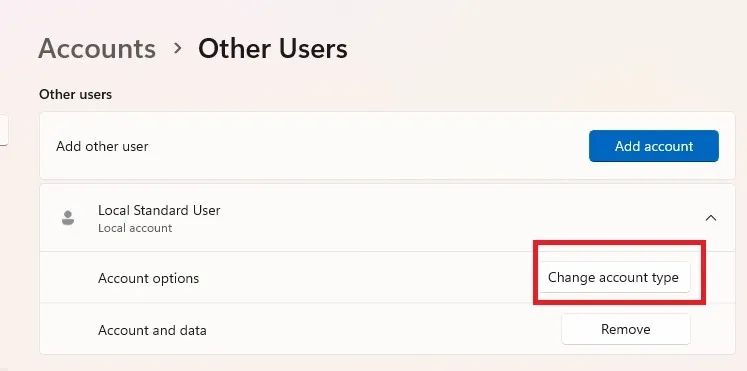
- Select the desired user from the list.
- Press “Change account type.”
- Select “Administrator” from the account type list and press “OK” to confirm.
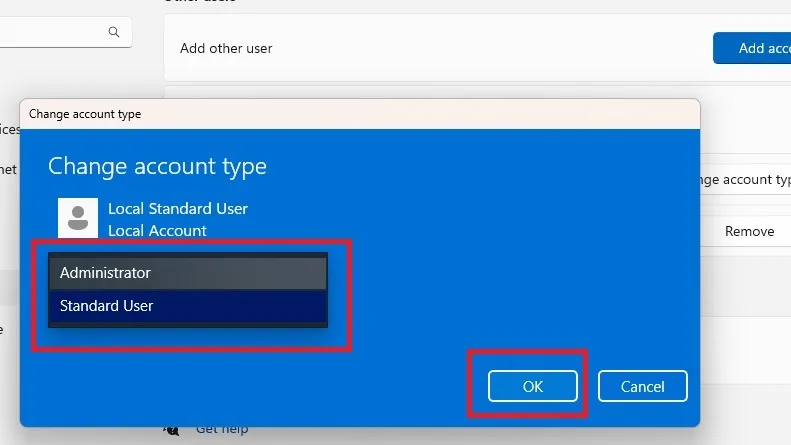
You can easily demote an administrator account using the same method.
2. Using the Control Panel
Follow these procedures if you wish to change settings through the Control Panel rather than Settings:
- Go to Start and search for “control panel,” then click “Open.”
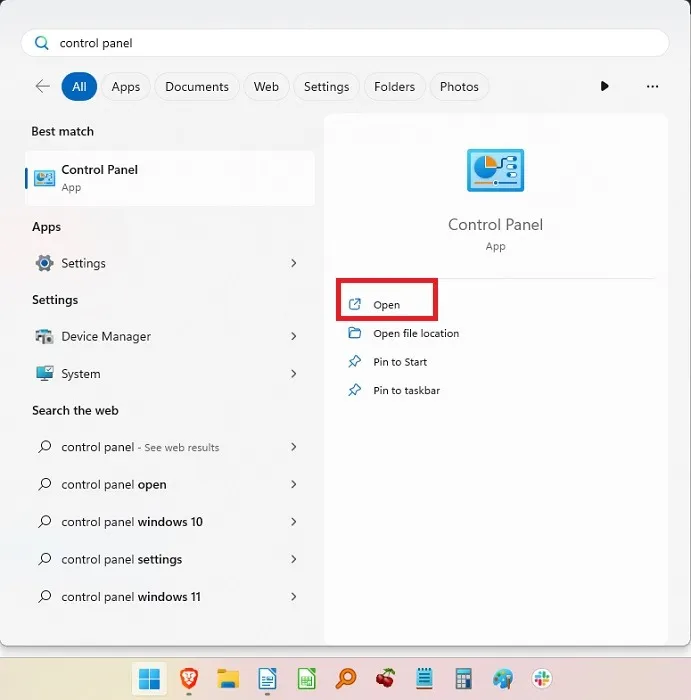
- Select “User Accounts.”
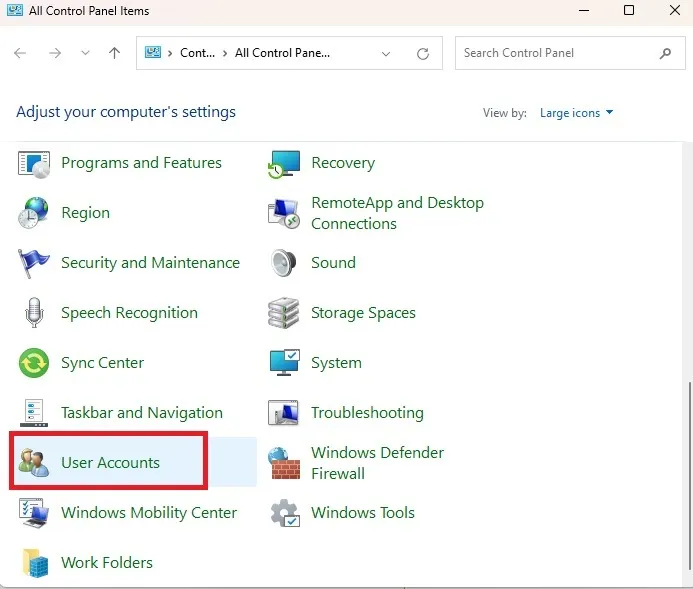
- If you want to change your own account type, select “Change your account type.” For other accounts, select “Manage another account.”
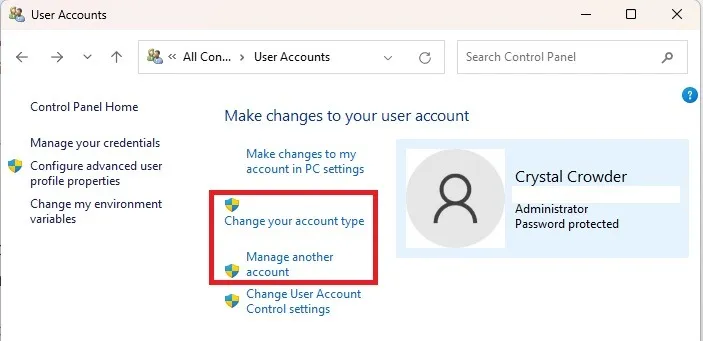
- Select the account you want to change, then “Change the account type.”
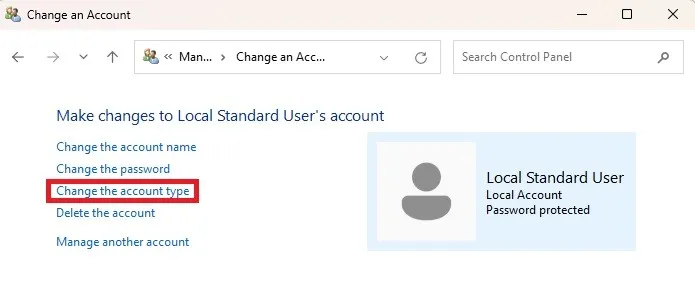
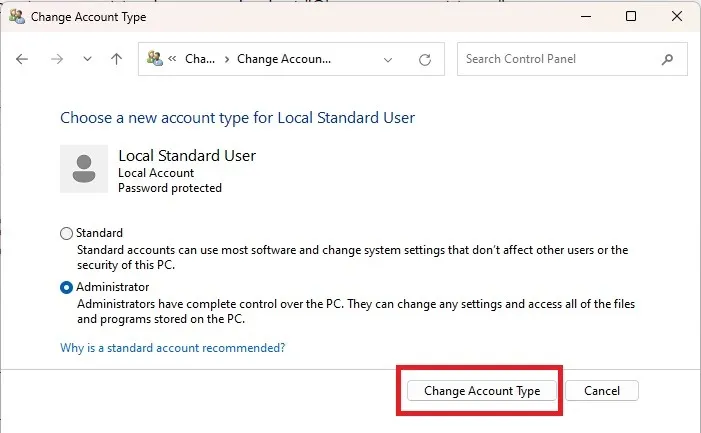
- Select “Administrator” (or “Standard” if you’re demoting) and press “Change Account Type.”
3. With Command Prompt
It is not difficult to switch between the Standard user account and the Administrator user account on Windows if you do not mind putting in a few instructions. To get started, let’s promote one of the Standard users to the Administrator role.
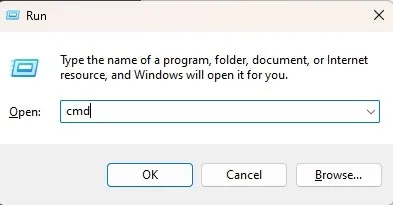
- Press Win + R, type
cmd, then press Ctrl + Shift + Enter to open Command Prompt with admin privileges.
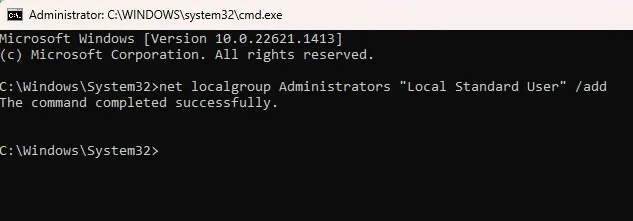
- Type the following to change the user account type to administrator:
net localgroup Administrators "User Account"/add
Just replace “User Account” with the actual name of the user account. When signing in to your Microsoft account, enter the first five letters of the email address associated with the account. The user account name “windo” might be used, for instance, for the email address windowsuser@microsoft.com. Keep in mind that you do not need a Microsoft account in order to use Windows 11.
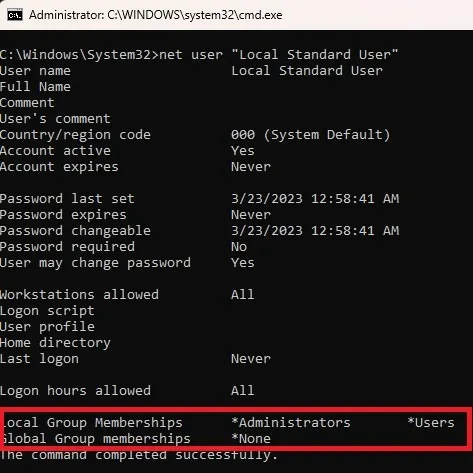
- Verify the change by typing:
net user "user name"
In the event that an administrator needs to be demoted, the procedure is as follows:
- Enter the following command, replacing “User Account” with the account name:
net localgroup Administrators "User Account"/delete

- Verify the change with:
net user "user name"
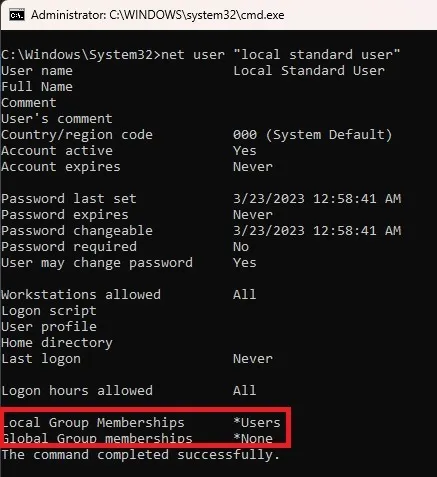
Helpful hint: confused between Command Prompt and PowerShell? We can help!
4. Use PowerShell
Windows 11 prioritized PowerShell above Command Prompt. Indeed, subsequent versions of Windows 10 eliminated Command Prompt from the power user Start menu in favor of PowerShell. If you prefer PowerShell, follow these steps to change the Administrator in Windows 10 and 11:
- Press Win + X and select “Terminal (Admin).” For Windows 10, select “PowerShell.”

- Type the following at the prompt, replacing “user account” with the account name:
Add-LocalGroupMember -Group "Administrators"-Member "User Account"
Just like Command Prompt, the user name for Microsoft accounts is the first five letters of the account’s email address. You can also use -Member "MicrosoftAccount\emailaddress".

This promotes a Standard user to an Administrator. If you need to demote an account:
- Open PowerShell and enter the following, replacing “User Account” with the account name:
Remove-LocalGroupMember -Group "Administrators"-Member "User Account"

- This switches the account to a Standard user.
5. Use netplwiz
Netplwiz is another quick and easy way to change the administrator on Windows. Using this way, every user is mentioned, and you can switch between user types as needed.
- Press Win + R to open the Run box.
- Enter “netplwiz” and click “OK.”

- Select the desired user and click “Properties.”
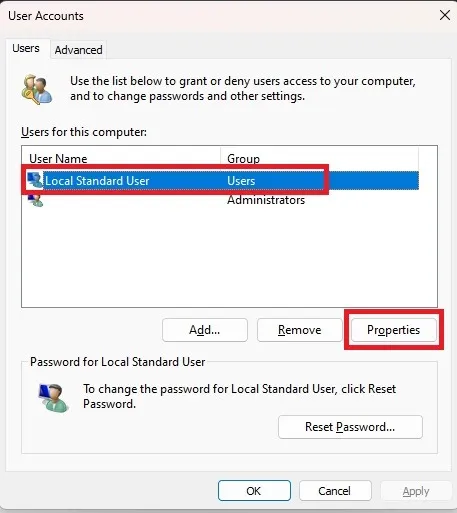
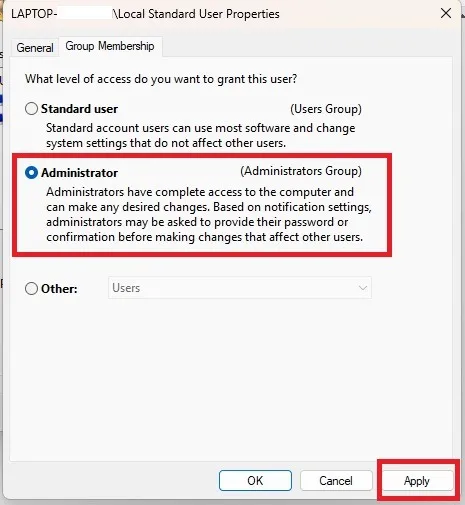
- Select the “Group Membership” tab and change the account type. Click “Apply.”
FYI: follow this guide to change the account and user name in Windows.
6. Via Computer Management
This solution is only applicable to Windows 10 and 11 Pro editions. This option will not be available if you have the Home version, like I do. To change the account in Windows 10 and 11, follow these procedures.
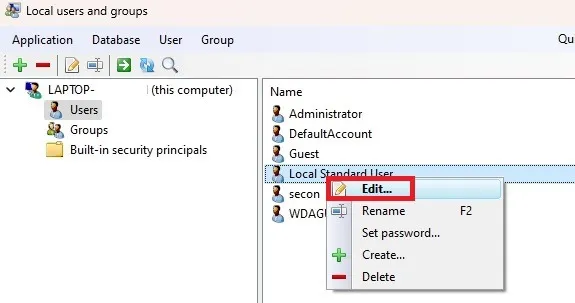
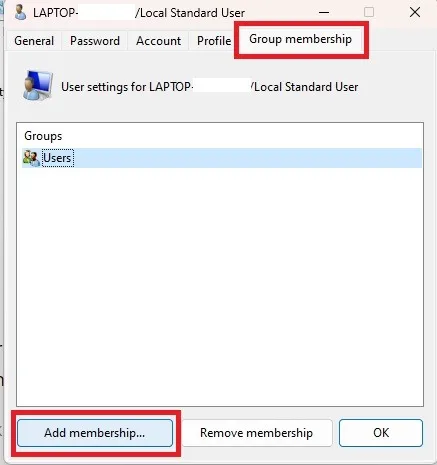
You can use the third-party tool lusrmgmr to get the same results. For the purpose of this tutorial, I’m including the steps for both the Pro version of Windows and lusrmgmr. The screenshots are from lusrmgmr.
- Open the Start menu and search for “Computer Management.” Select “Run as administrator.”
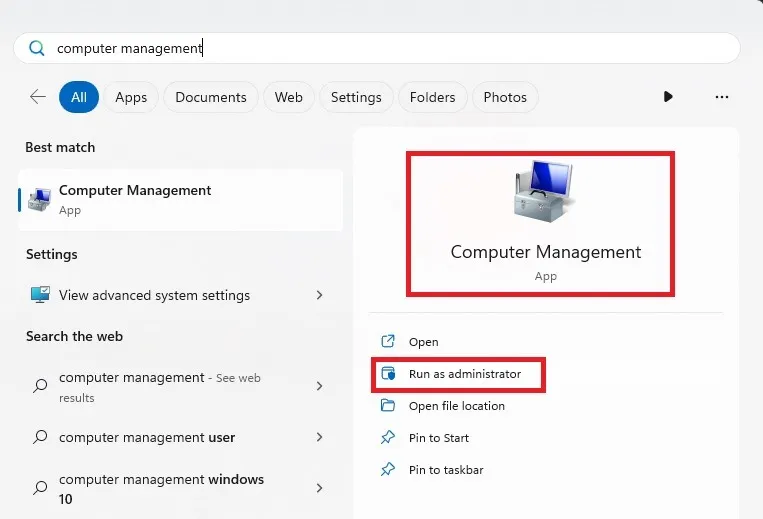
- Expand “System Tools -> Local Users and Groups.”

- Select “Users” to open the list of users in the center pane.
- Right-click the user and select “Properties.” Click “Edit” for lusrmgmr.
- Select the “Member Of” tab and click “Add.” If using lusrmgmr, click the “Group membership” tab and select “Add membership.”
- Select “Advanced.”
- Select “Find Now.”
- Choose the “Administrators” group from the list. In lusrmgmr, the group list appears immediately. Choose “Administrators.”
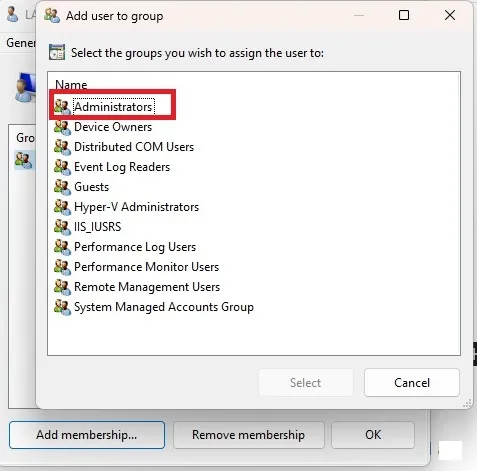
- Click “OK” to confirm your choice. In lusrmgmr, choose “Select.”
- Click “OK” again to exit the window. You should then see the user listed as both a user and administrator.
Using the same procedure, you may also demote a user. You will, however, be withdrawing the permission rather than adding it.
Frequently Asked Questions
Can I disable the built-in administrator account?
Yes. This is done under the Local Users and Groups section of Computer Management. Instead, use the lusrmgmr utility instead. Click the “General” page (or the “Account” tab in lusrmgmr) to deactivate the account.
If you forget your password and need to log in, this account is quite beneficial. Of course, this applies only if you haven’t already reset the password for this account.
But, if you are not using this account, you should disable it. It might be a security issue because it does not have a password activated by default. Regular users can use it to circumvent your administrator access.
Should I let all users be administrators on my personal computer?
Only do this if you don’t mind each user having full access to the PC and the ability to make whatever modifications they wish. A family Computer typically features just the adults as administrators and the children as normal users.
Why should I promote another user to administrator?
Ordinary users have fewer options. Users cannot install software or perform substantial system changes, including as altering the registry, without the authorization of the administrator. A UAC (user account control) window will appear, demanding them for their password.
If you don’t want to go through the trouble of authorizing every update and software installation, it can be worth promoting them. Before editing the registry, an administrator should learn how to back up and restore the Windows registry.
Can I change user access temporarily?
Yes. You can grant administrator access temporarily at any time. When the user has completed their tasks, you can revert them to a Normal user.
Can I just change the user account name?
Yes. If you misspelled the name or just wish to modify it, follow these instructions.
Image credit: Unsplash. All screenshots by Crystal Crowder.
Leave a Reply