20 Privacy Settings You Should Look Into in Windows
It’s no secret that big tech companies want to know what you’re doing online and beyond. They’re looking to gather and use that information for their own needs, so you need to be aware of what they are collecting. If you want to reduce the amount of data going out about you, use the extensive Windows 11 and 10 privacy settings discussed in this guide.
1. Windows General Privacy Settings
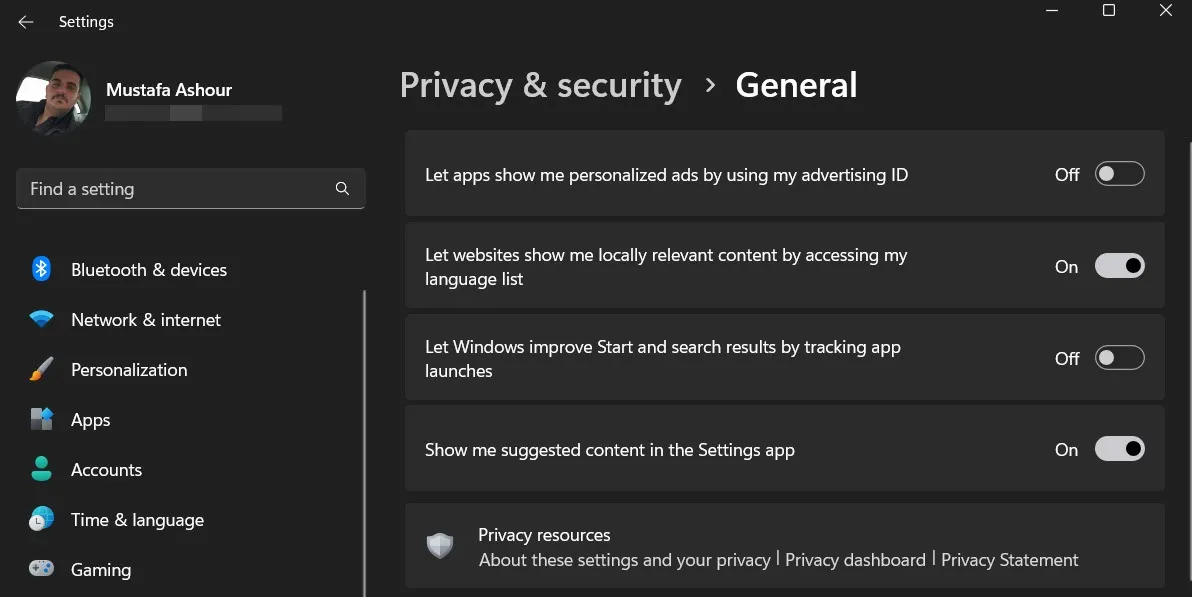
The first stop when it comes to Windows privacy should be checking the general options via the Settings app. You can access them by visiting “Settings -> Privacy & Security -> General.”

There are four options, including “Show me suggested content in the Settings app,” that you need to disable here. Make sure you toggle all of them “Off.” In Windows 10, you will find fewer general options.
2. Disable Speech Recognition
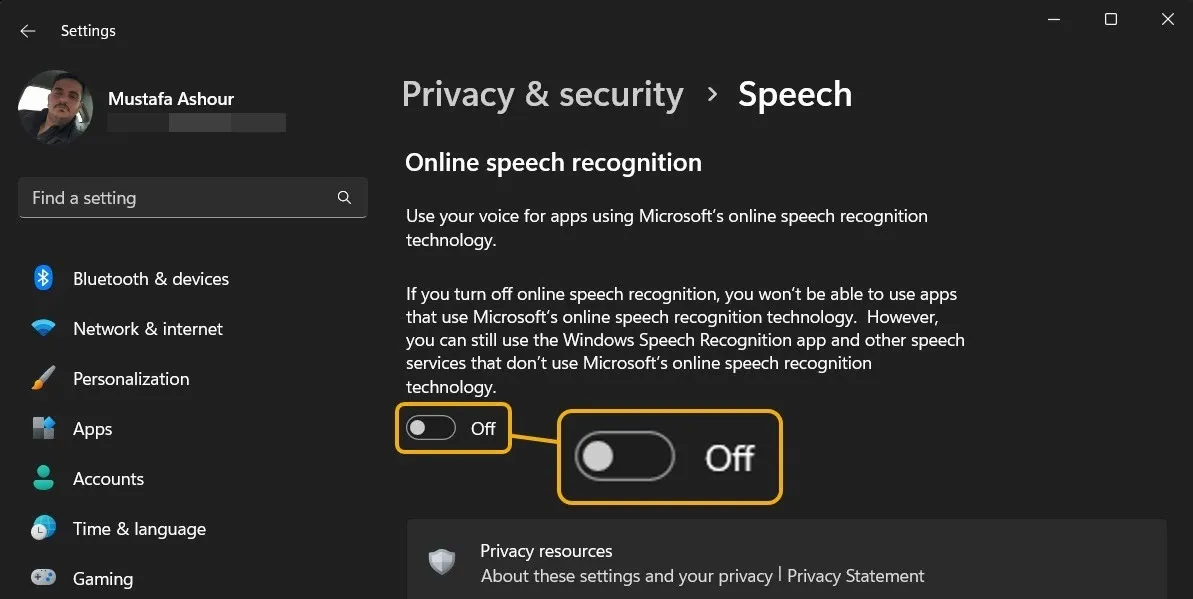
Windows’s speech privacy settings give you the option to prevent Microsoft from storing your voice in the cloud. This data can be used to improve Microsoft’s cloud-based speech services. If you don’t want this, disable the feature. Do note that without this option enabled, you will not be able to use Cortana. If you use other speech services that do not rely on the cloud, they will still work.
To turn off speech recognition, go to “Settings -> Privacy & security -> Speech.” Toggle the “Online Speech Recognition” option off. In Windows 10, you can find this feature (and the others described below) under “Privacy.”
You can also disable Cortana on Windows 11 simply by signing out.
FYI: Windows has its own built-in Voice Typing feature, and turning off Online Speech Recognition will not affect it.
3. Inking & Typing Personalization
Inking and typing personalization saves your typing and handwriting patterns on tablets and 2-in-1 computers. Without it, you may lose some of the features you are used to, but just as with Speech, the services stored only on your computer will still work fine.
To disable the feature, head to “Privacy & security -> Inking & Typing Personalization.” Turn “Custom inking and typing dictionary” off.

On the same “Inking & typing personalization” page in Windows 10, you’ll find the “Getting to know you” option. Turn this off.
4. Diagnostics & Feedback Settings
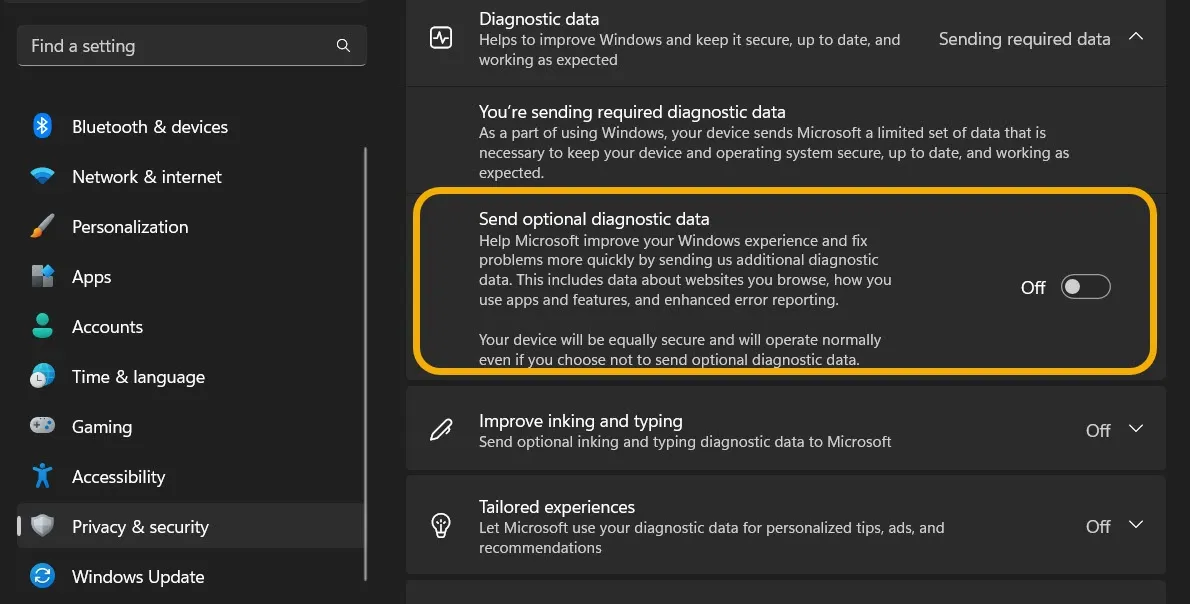
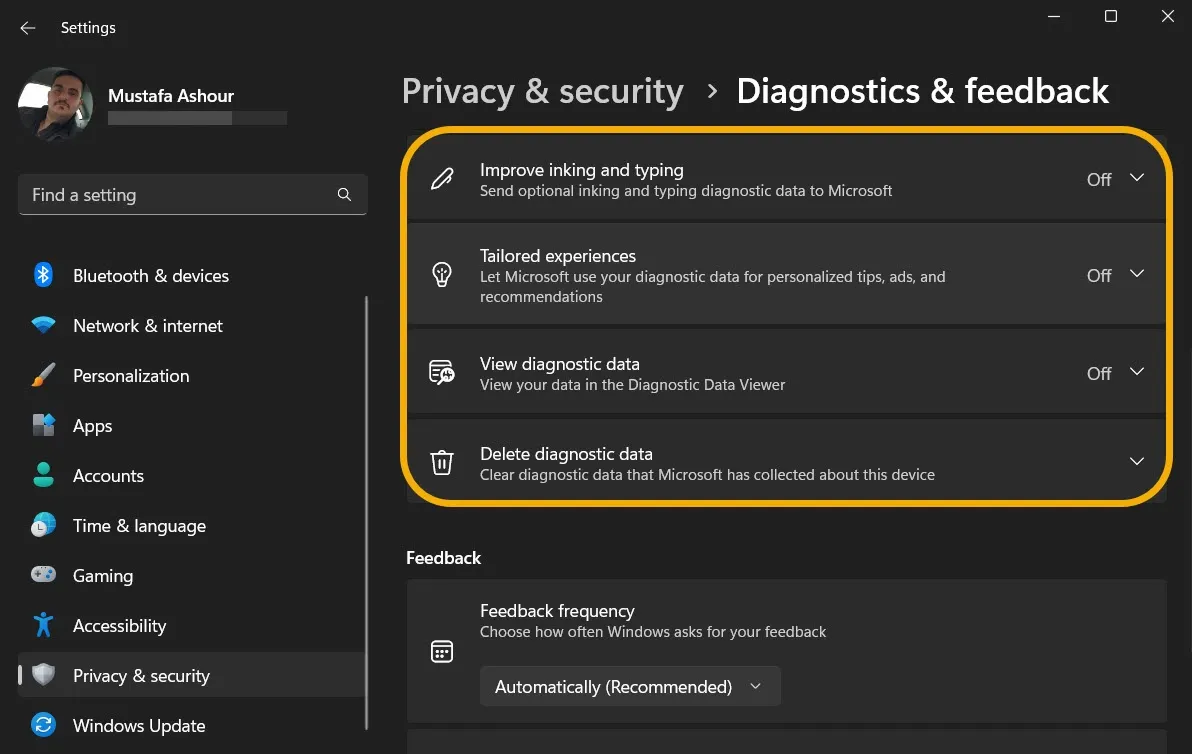
This section is where you control how much diagnostic and usage data you want Microsoft to have access to. You will probably want to allow as little data as possible to transmit over the Internet.
To start managing these settings, go to “Privacy & security -> Diagnostics & feedback.” Toggle off “Send optional diagnostic data” to stop your Windows device from sharing additional data with Microsoft. This includes the websites you visit and how you use your apps.
5. Activity History
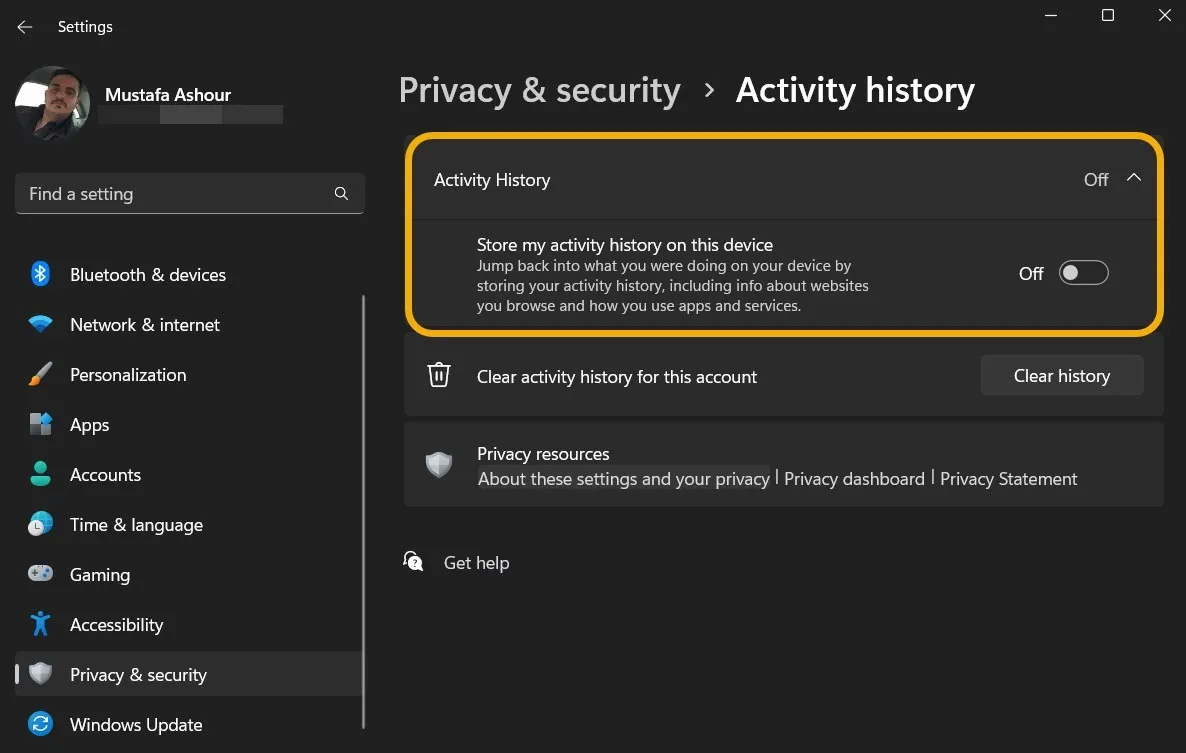
You may also want to check the Activity History to determine whether information about your computer usage is being sent to Microsoft. If it is, you can turn it off.
Go to “Privacy & security -> Activity history.” Turn the “Activity history” feature off.
6. Location Privacy
Turning off the Location feature on your device will eliminate the possibility of your computer sending your physical location to Microsoft. It will also keep apps from doing the same.
In Windows 11, users can enable location services for the device but disable them for specific apps. Yet, we advise you to turn off Location altogether. Go to “Privacy & security -> Location,” then disable “Location services.” Note that you can add exceptions to the rule.

Note that you can set a “Default location” for your machine. This will allow you to set your location without enabling location services to make location-dependent apps and services work better.

7. Camera and Microphone
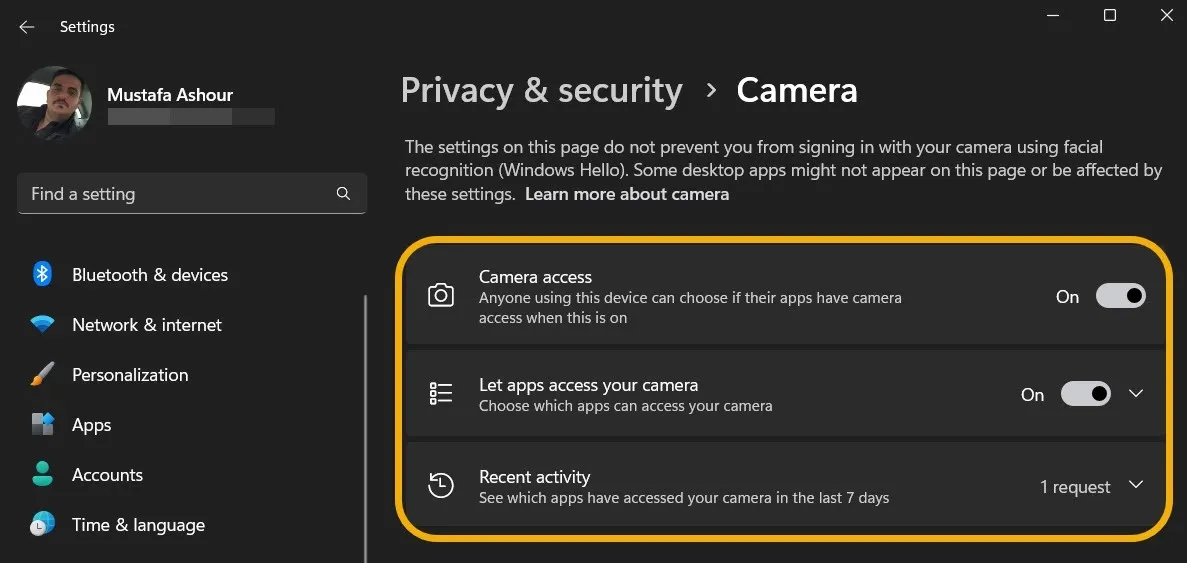
Keeping track of Camera and Microphone settings prevents random apps from using these built-in tools without permission.
Go to “Privacy & security,” then “Camera” and “Microphone” under the “App permissions” section.

Under Camera, you can enable or disable the system-wide access or manage which apps can access your camera. You can also see all the app requests to access the camera under “Recent activity.”
You’ll find similar settings under “Microphone.”
8. Notifications Access
This option allows you to manage whether you want your apps to have access to your device’s notifications. Disabling it will not affect how your notifications work.
Navigate to “Privacy and security -> Notifications.” Disable “Notification access.”

9. Account Info
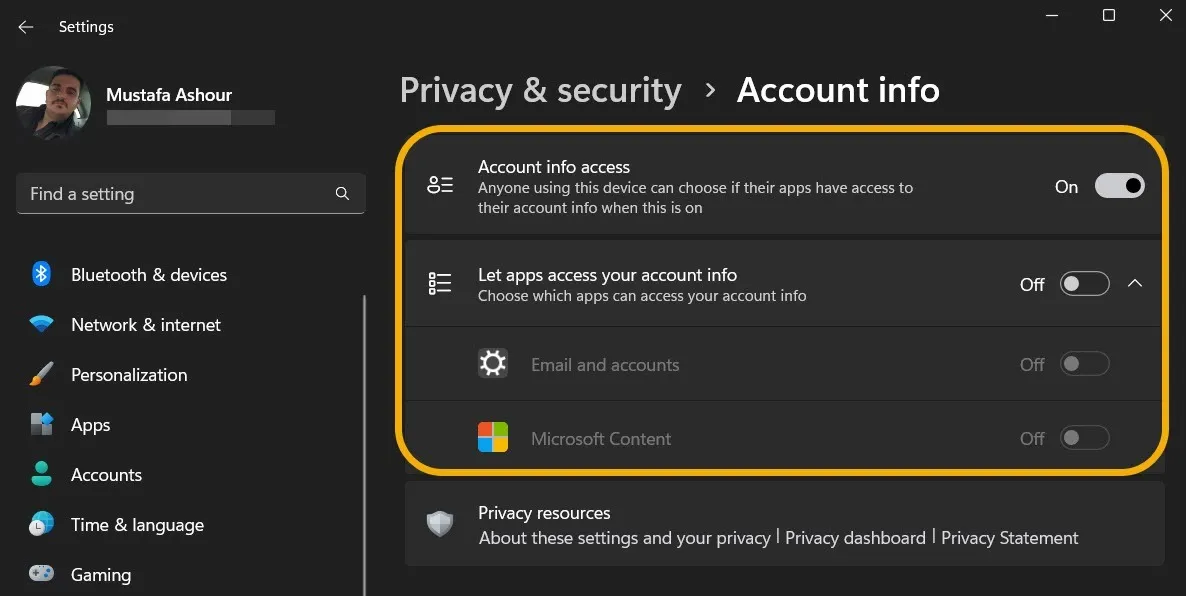
Don’t want your apps to have access to your account information? This setting will allow you to turn off that access and keep your account information safe.
Go to “Privacy & security -> Account info” and click on it to expand it. Choose whether you want the apps on your Windows device to access your Microsoft account information, and if you do, choose whether you want to prevent specific apps from doing so.
10. Contacts and Calendar
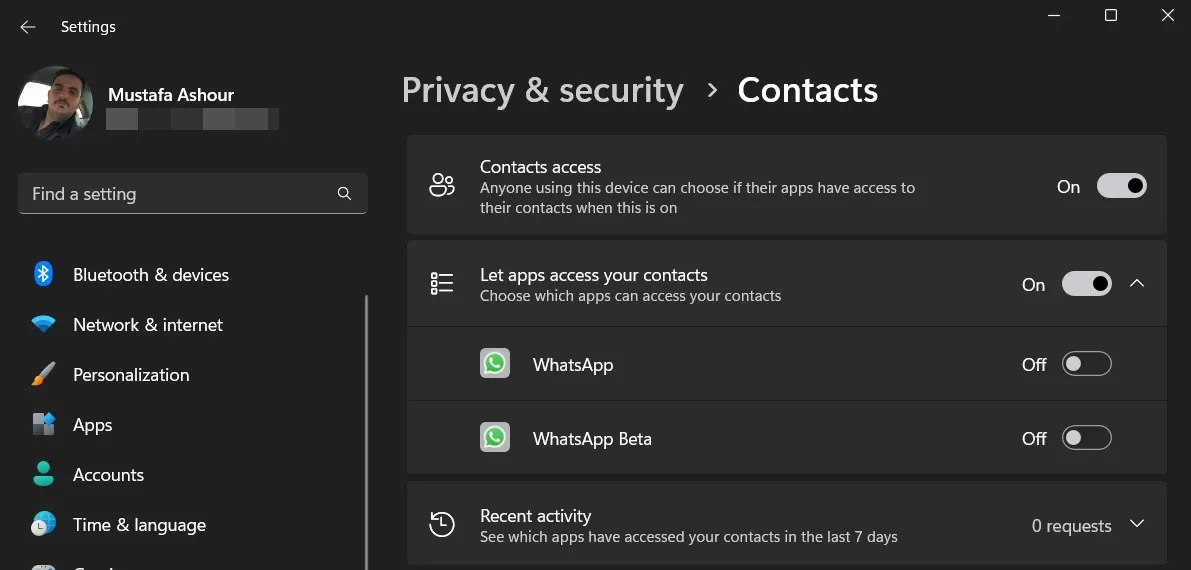
These two sets of options let you choose which apps are allowed to access Contacts and Calendar.
Head to “Privacy & Security” and open “Contacts” and “Calendar.” You can allow system-wide access to contacts, disable it, or select the specific apps to grant access.
11. Call History
It seems that few people use their Windows machine for making phone calls, but if you do, you’ll want to check this setting to make sure that no other random apps are accessing that data.
Go to “Privacy & security -> Call history” and disable the “Call history access” option from there. You can also select your preferred permissions for apps.

12. Email
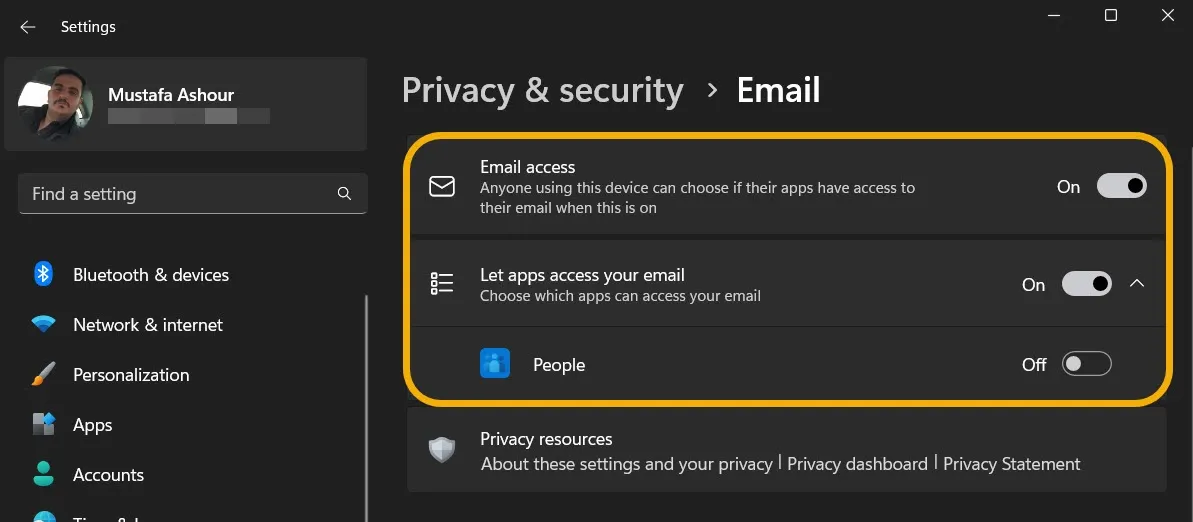
Navigate to “Privacy & security -> Email.” Turn off “Email access” or choose whether you want to allow it for specific apps.
13. Tasks and Messaging
Windows also lets you decide whether you want your apps to have access to your task lists and messages, if you have these set up. If so, select the appropriate apps.
Access “Tasks” and “Messaging” under “Privacy & security.” Enable or disable the access.

14. Radios
Radios are the transmitters that send information via Bluetooth and Wi-Fi, among others. Most likely, you will need these to be on, but you can control which apps are using them by toggling the On/Off switch next to each app.
Navigate to “Privacy & security -> Radios” and tap it to expand. Choose whether to disable this service or limit its access to specific apps.

15. Other Devices
This setting allows your computer to communicate with wireless devices that haven’t explicitly paired with your computer. If you don’t want this to happen, go to “Privacy & security -> Other devices.”

16. Background Apps
Checking this setting will not only improve privacy, it will also improve performance. If you have too many apps running unnecessarily in the background, it can slow down your computer, so check this list and turn off those running apps that you don’t need.
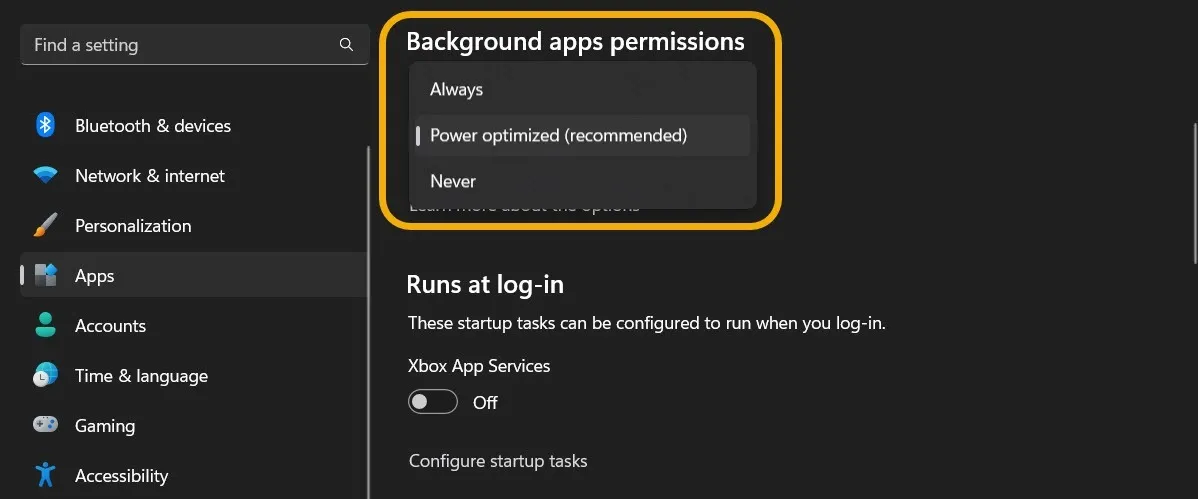
Unlike Windows 10 users, Windows 11 users can’t disable the background activity for all apps at once – they need to be disabled one by one. Go to “Settings -> Apps -> Installed apps,” then click the three-dot icon next to the app and select “Advanced options.”

You can manage the background activity for this app. Select “Never” if you don’t want it to work in the background.
In Windows 10, you can use the “Let apps run in the background” slider to prevent any app from doing so.
FYI: stop apps from going online in Windows, as explained in our guide.
17. App Diagnostics
This setting determines how much information you will send Microsoft if you need a problem diagnosed. You should only submit information about the affected apps. In general, there’s no harm in turning this feature off for increased Windows privacy.
You can do so from “Privacy & security -> App diagnostics.” You can disable “App diagnostic access” and “Let apps access diagnostic info about your other apps.”

18. Automatic File Downloads
The Automatic file downloads section unblocks apps so that they can automatically download files from online cloud storage services. If you use online storage to keep your hard drive from filling up, you’ll want to allow only certain apps to request access to these files.
From “Privacy & security,” select “Automatic file downloads” and apply your preferred settings.

19. Documents, Pictures, Videos, and Your File System
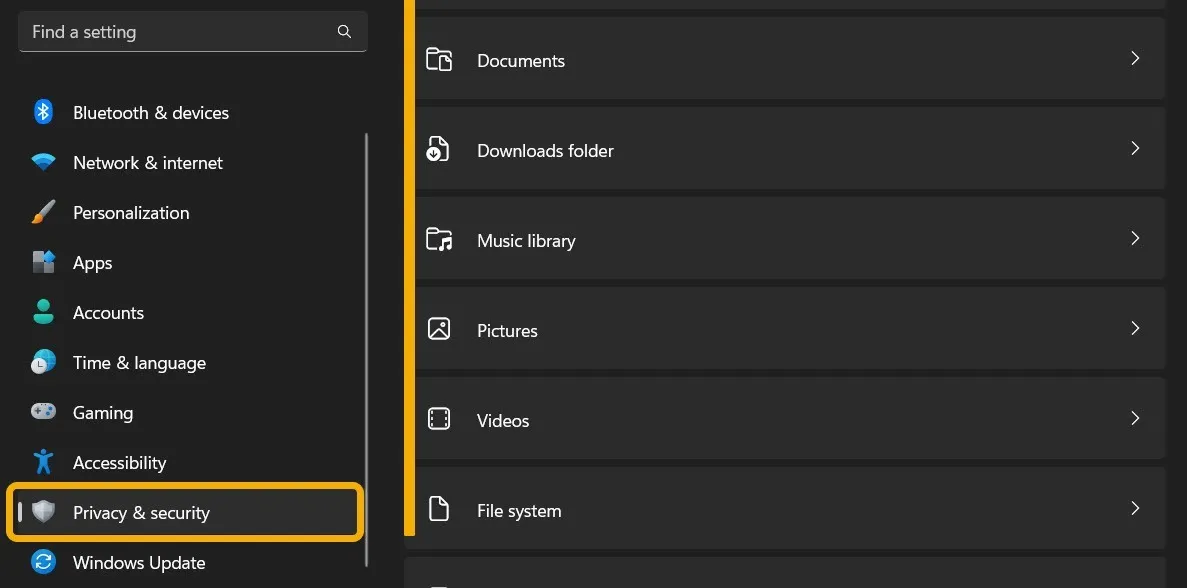
You can also control which apps have access to your documents, music library, pictures, videos and file system. Click on each of them (they are listed at the bottom of the screen) to modify the list that is allowed access.
20. Microsoft Privacy Dashboard
Microsoft’s Privacy Dashboard is a little-known tool that allows you to see the tracking data and information that Microsoft has already collected that’s linked to your Microsoft account.
You can access the Microsoft Privacy Dashboard via this page. Sign in with your Microsoft account so that you can delete data or optimize more privacy preferences.

Keeping Your Information Private
- Tweet
Leave a Reply